
How to Clear P0420 Code with an O2 Sensor Spacer (Step-by-Step)
If your dashboard lights up with a Check Engine Light (CEL) and your diagnostic scanner points to Diagnostic Trouble Code P0420 (Catalyst System Efficiency Below Threshold), you are likely dealing with the aftermath of an exhaust modification, such as a catalytic converter delete or an aftermarket downpipe installation. For car owners looking for a practical, mechanical fix without expensive ECU recalibrations or replacing the original converter, installing an O2 sensor spacer is one of the most reliable solutions. This comprehensive guide explains how these adapters work, where they must be placed, and how to complete the installation safely.
Most O2 sensor spacers and mini-catalyst adapters sold in the U.S. aftermarket are manufactured in Chinese automotive component hubs, primarily in Zhejiang, Guangdong, and Shandong provinces. These factories mass-produce the full common design range—straight, 45-degree, and 90-degree models—with standardized M18x1.5 threading, and 304 stainless steel is the most widely used base material for heat and corrosion resistance. Build precision and material grade can vary across manufacturers and price tiers.
Why Do Exhaust Modifications Trigger Code P0420?
To understand how an oxygen sensor spacer resolves your issue, it helps to review how your vehicle's On-Board Diagnostics (OBD-II) system monitors emissions: Upstream Sensor (Sensor 1): Located before the catalytic converter, this sensor measures raw oxygen levels in exhaust gas to help the Engine Control Unit (ECU) regulate air-fuel ratios. Downstream Sensor (Sensor 2): Positioned after the catalytic converter, this sensor monitors whether the catalyst is effectively burning off unburnt hydrocarbons.
When a catalytic converter is removed or replaced with a high-flow pipe, raw exhaust rushes past both sensors simultaneously. Because the downstream sensor mirrors the fluctuating voltage patterns of the upstream sensor, the ECU concludes that the catalyst has failed and triggers code P0420.
How an O2 Sensor Spacer Solves the Problem
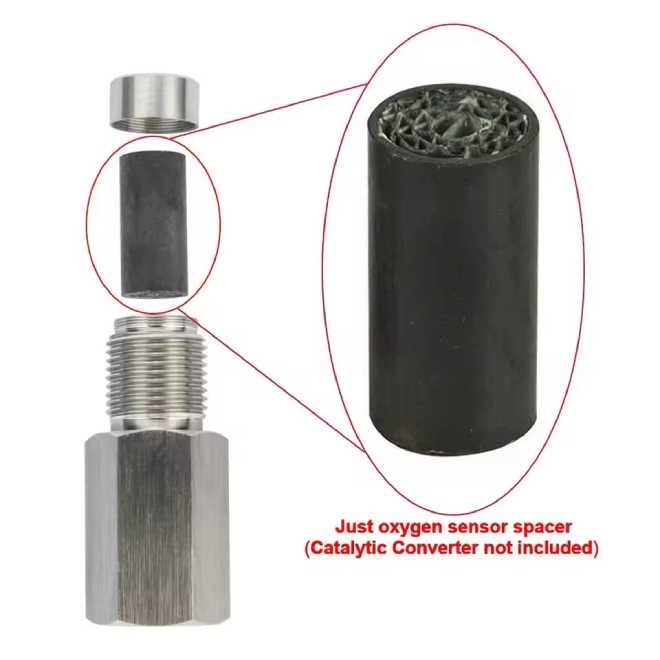
An O2 sensor spacer (often threaded with standard M18x1.5 dimensions) acts as a mechanical extension adapter screwed directly into the exhaust pipe bung. Restricting Gas Exposure: By backing the sensor tip away from the primary exhaust flow path, the adapter limits the volume of raw gas hitting the sensing element. Smoothing Voltage Fluctuations: This dampening effect produces a stable, flat-line voltage output that matches what the ECU expects to see from a healthy, functioning catalytic converter. The Mini-Catalyst Advantage: Standard hollow spacers work for many older vehicles, but modern sensitive ECUs often require a mini-catalyst spacer—an adapter packed with an internal miniature catalytic substrate that actually cleans a small sample of exhaust gas before it reaches the sensor tip.
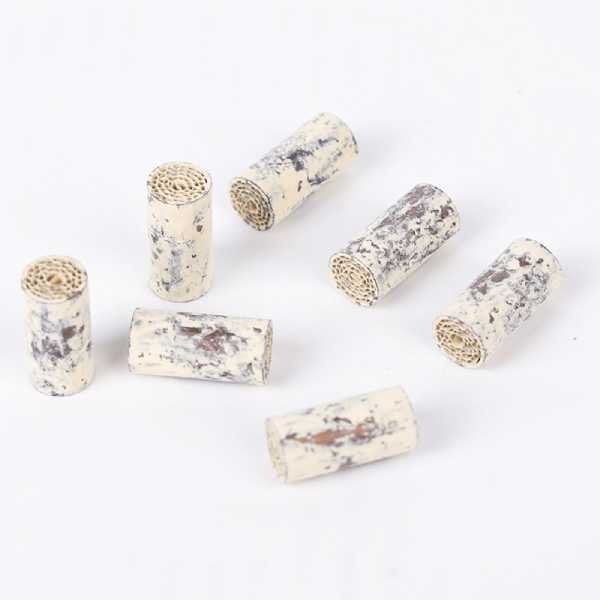
China is a major global producer of the miniature catalytic substrates integrated into these upgraded spacers. The ceramic honeycomb cores, coated with platinum, palladium, and rhodium for three-way catalysis, are manufactured at scale, which helps lower overall unit costs for aftermarket adapters. Precious metal loading and core cell density (typically around 400 CPSI for mainstream products) do, however, differ between product grades.
Step-by-Step Guide: Installing a Downstream O2 Sensor Spacer
Before starting, ensure the exhaust system is completely cool to avoid severe burns.
                               ┌─── Step 1: Locate the Downstream O2 Sensor (Sensor 2)
                                │
                                ├─── Step 2: Unplug and Remove the Sensor Carefully
                                │
Installation Workflow ─────────┼─── Step 3: Thread and Secure the Spacer / Mini-Cat
                                │
                                ├─── Step 4: Reinstall the O2 Sensor into the Adapter
                                │
                                └─── Step 5: Clear Trouble Codes & Run Drive Cycle
Step 1: Locate the Downstream O2 Sensor
Identify the secondary oxygen sensor (Sensor 2), which is always located after the catalytic converter or test pipe position. Crucial Warning: Never install a spacer on the upstream (Sensor 1) position. Upstream sensors control essential air-fuel management; altering their placement will disrupt engine performance and fuel trims.
Step 2: Remove the Sensor
Disconnect the oxygen sensor's electrical wiring harness to prevent twisting or damaging the wires. Using an O2 sensor socket and a ratchet, carefully unscrew the sensor from the exhaust pipe bung. If the threads are rusted or stuck due to carbon buildup, apply a penetrating lubricant and let it sit before turning.
Step 3: Install the Spacer Adapter
Screw your chosen spacer (straight, 45-degree, or 90-degree depending on chassis clearance) into the exhaust pipe bung. Tighten it securely using a wrench, ensuring it is snug to prevent any exhaust gas leaks around the threading.
Step 4: Mount the O2 Sensor into the Spacer
Insert the oxygen sensor into the open end of the newly installed spacer and tighten it firmly. Reconnect the electrical wiring harness, ensuring the wires are securely routed away from extremely hot exhaust pipes to prevent melting.
Step 5: Clear Fault Codes and Test Drive
Plug an OBD-II scanner into your vehicle's diagnostic port under the dashboard. Erase the stored P0420 trouble code from the ECU memory. Take your car for a 15 to 30-minute drive cycle combining city and highway driving. This allows the vehicle's internal readiness monitors to re-run and confirm that the modification successfully keeps the check engine light off.
Many spacer options sold under different U.S. brand names originate from shared Chinese production lines. Marketing labels like “premium” or “heavy-duty” are not uniformly standardized across products, so buyers are advised to verify core specifications such as material grade and catalyst cell density when selecting a unit for their vehicle.
Frequently Asked Questions
Will an O2 sensor spacer work on all vehicle makes and models?
Mechanical and mini-catalyst spacers work successfully on a wide range of OBD-II vehicles, particularly older platforms and standard sports cars. However, ultra-sensitive modern performance vehicles with stringent ECU diagnostic algorithms may occasionally require custom software tuning to permanently bypass efficiency monitors.
How long does it take for the computer to recognize the fix?
Clearing the code with an OBD-II scanner turns off the dashboard light instantly, but the ECU requires a proper drive cycle to verify system status. If the spacer successfully isolates the sensor from excessive exhaust fluctuations, the monitor will pass and the light will remain off permanently.
What is the difference between straight and 90-degree spacers?
Straight spacers work best when there is ample vertical clearance beneath the vehicle's floor pan. If your aftermarket downpipe places the sensor close to heat shields, transmission tunnels, or chassis members, a 90-degree angled spacer provides the necessary offset to fit the sensor safely without clearance issues.
Leave a Reply