
When it comes to DIY car repair and maintenance, having the right tools is essential. One such tool that every DIY enthusiast should have in their toolkit is the Oxygen Sensor Socket. In this article, we will explore the importance of the Oxygen Sensor Socket and provide a step-by-step guide on how to use it effectively for car repair.
The Significance of the Oxygen Sensor Socket
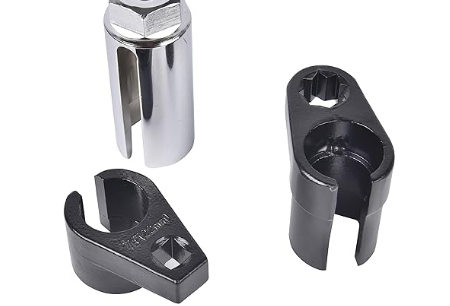
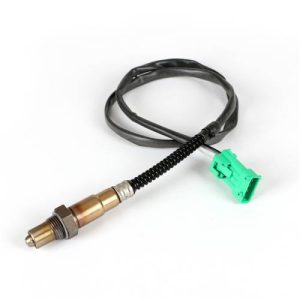
The Oxygen Sensor Socket is a specialized tool designed to facilitate the removal and installation of oxygen sensors in a vehicle's exhaust system. These sensors, also known as O2 sensors, play a critical role in monitoring and regulating the air-fuel mixture for optimum engine performance and emissions control. Over time, O2 sensors may need replacement due to wear and tear, and this is where the Oxygen Sensor Socket becomes invaluable.
Step-by-Step Guide on Using the Oxygen Sensor Socket
Using an Oxygen Sensor Socket for car repair is relatively straightforward, provided you follow the right steps:
Safety First: Always ensure that your vehicle is parked on a level surface, the engine is turned off, and the ignition key is removed. Wear appropriate safety gear, including gloves and eye protection.
Locate the O2 Sensor: Identify the oxygen sensor that needs to be replaced. They are typically located in the exhaust system, both upstream (before the catalytic converter) and downstream (after the catalytic converter). Consult your vehicle's service manual if you are unsure about the sensor's location.
Prepare the Socket: Choose the appropriate size of the Oxygen Sensor Socket that matches the sensor's size. The socket will have a slot or groove to accommodate the sensor's wiring harness. Ensure that the socket is clean and in good condition.
Loosen the Sensor: Insert the Oxygen Sensor Socket onto the sensor's hexagonal nut. Use a ratchet wrench to turn the socket counterclockwise to loosen the sensor. It may require some effort, so be patient.
Remove the Sensor: Once the sensor is sufficiently loosened, you can remove it by hand. Be cautious not to damage the sensor's wiring during this process.
Install the New Sensor: Thread the new oxygen sensor into the exhaust system by hand, ensuring it is properly aligned. Use the Oxygen Sensor Socket and ratchet wrench to tighten it securely, but do not over-tighten.
Reconnect the Wiring: Reattach the wiring harness to the new sensor, ensuring a secure connection.
Test the Sensor: Start your vehicle and check for any warning lights or error codes related to the oxygen sensor. If none are present, your replacement was successful.
Benefits of Owning an Oxygen Sensor Socket
Owning an Oxygen Sensor Socket offers several benefits, including:
Time-saving: It makes the removal and installation of oxygen sensors quicker and more efficient.
Reduced Risk of Damage: The socket is designed to fit the sensor snugly, minimizing the risk of damaging the sensor or its wiring during removal.
Cost-effective: DIY enthusiasts can save money by performing oxygen sensor replacement themselves instead of paying for professional labor.
Conclusion:
The Oxygen Sensor Socket is a must-have tool for DIY enthusiasts who want to take control of their car repair and maintenance. By understanding its significance and following the step-by-step guide provided, you can confidently use this tool to replace oxygen sensors in your vehicle, ensuring optimal engine performance and emissions control.


Leave a Reply