
Welcome, fellow automotive enthusiasts! In this article, we will delve into the detailed guidelines for installing the oxygen sensor 15716 in the 2011 Grand Marquis. As a crucial component of the vehicle's emission control system, the proper installation of the oxygen sensor is essential to ensure optimal performance and reduced environmental impact. So, let's get started with the installation process and key considerations to keep in mind.

Understanding the Oxygen Sensor 15716
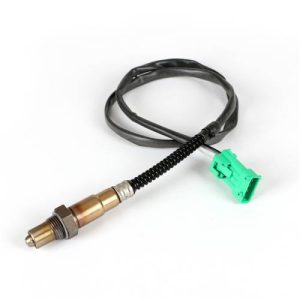
Before diving into the installation process, let's take a moment to understand the significance of the oxygen sensor 15716. This sensor, also known as the O2 sensor, plays a pivotal role in measuring the oxygen content in the exhaust gases. It provides crucial data to the engine control unit (ECU), allowing it to adjust the air-fuel mixture for efficient combustion. The oxygen sensor 15716 is specifically designed for the 2011 Grand Marquis model, ensuring precise readings and seamless compatibility.
Step-by-Step Installation Guide
Now that we comprehend the importance of the oxygen sensor 15716, let's move on to the step-by-step installation process. Remember, proper installation is vital to avoid potential issues and to maintain the vehicle's performance at its peak. Here's what you need to do:
Safety First: Before starting any installation, ensure that the engine is turned off and has cooled down. Additionally, disconnect the negative terminal of the battery to avoid any electrical mishaps during the process.
Locating the Sensor: The oxygen sensor 15716 is typically located along the exhaust pipe, near the catalytic converter. Use the vehicle's manual to identify the exact location, and you may need to raise the car using jack stands for easier access.
Removal of the Old Sensor: To replace the oxygen sensor 15716, you will require an O2 sensor socket or a wrench. Carefully disconnect the electrical connector and then use the tool to unscrew the sensor from the exhaust pipe. Be gentle to avoid damaging the threads.
Installing the New Sensor: Before installing the new oxygen sensor 15716, apply anti-seize compound to the threads. This will help prevent corrosion and make future replacements easier. Hand-tighten the sensor into the exhaust pipe and then use the wrench to secure it snugly, but avoid overtightening.
Reconnecting the Electrical Connector: Once the new sensor is securely in place, reconnect the electrical connector, ensuring a proper fit. Double-check all connections before proceeding.
Battery Reconnection and Testing: With the sensor installed, reconnect the negative terminal of the battery. Start the engine and check for any warning lights on the dashboard. If everything looks good, take the vehicle for a test drive to ensure the oxygen sensor 15716 is functioning correctly.
Congratulations!
You have successfully installed the oxygen sensor 15716 in your 2011 Grand Marquis. By following these guidelines and taking proper precautions, you can ensure that your vehicle runs efficiently and adheres to emission standards. Regularly inspecting and replacing faulty oxygen sensors will not only improve your car's performance but also contribute to a cleaner and healthier environment.
Remember, if you are unsure about any step during the installation process, it is always best to seek assistance from a professional mechanic. Stay tuned for more automotive tips and tricks on our blog, and happy driving!


Leave a Reply